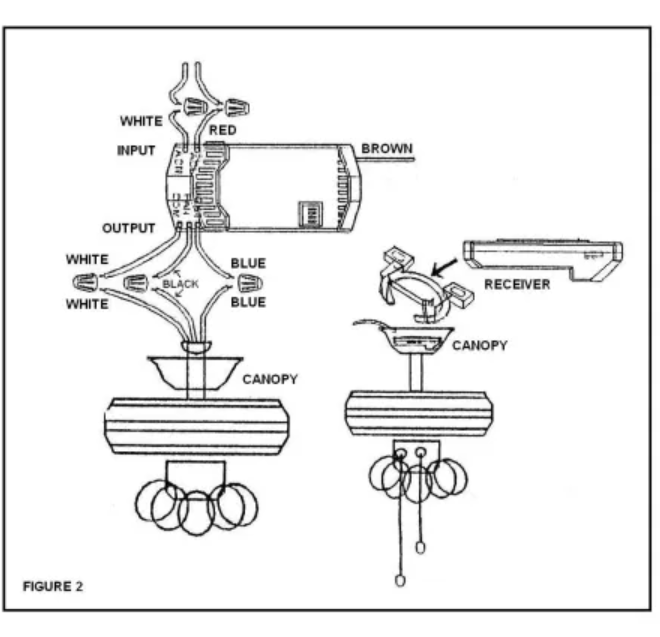
When it comes to Hampton Bay Ceiling Fan Wiring, you need to know that the wires of a standard fan and a remote control fan are different. Same is the case with other ceiling fan brands too. The wires from the fan need to be matched with the fan housing which is not a difficult task.
Standard Hampton Bay Ceiling Fan Wiring
Wiring for a standard ceiling fan by Hampton Bay that is without a remote, the instructions are listed below to install as well as connect them below.
The first thing is to make sure that you have turned off the power from the breaker. This means that access the fuse box or circuit breaker yourself to turn it off completely to stop the fan connection.
After doing that, you need to make the wires connection as shown below:
- Black wire on the fan stands for the fan supply wire
- Blue wire supplies power to the lights
- Blue and black wires are joined together with the black wire available in house wiring
- White wire goes with the white house wire
- Green wire goes with green conductor house wire

How to Wire a Hampton Bay Remote Control Ceiling Fan
Wiring up a remote control ceiling fan is almost the same, however, the receiver on the fan have to be wired in line with the fan itself. Use the below instructions to power the fan as well as light kit.
- Blue wire from fan should be linked with blue wire from the receiver
- Black wire on the fan should be attached to black wire on the receiver
- White wire on the fan should be linked with the white wire on the receiver
- Use the wire nuts to secure wire connections
- Use the black electrical tape to secure the nuts
- After that, twist black and blue wires from the receiver with the black house wire
- Join white wire from the receiver with white house wire
- Connect the green ground wire from the fan to the green grounding conductor house wire
- Use a wire net to secure each set of wires
- Use the black electrical tape to cover the nuts