Ceiling fan remote control troubleshooting is a common concern among homeowners seeking support or assistance with their Hampton Bay or Harbor Breeze ceiling fans. Interestingly, the remote control often becomes the primary culprit, stops communicating, experiences failures, needs new batteries, or needs troubleshooting. In this article, we will guide you through the process of troubleshooting your ceiling fan remote.
Check the batteries
When you face a ceiling fan problem, the most common and initial point of investigation is the batteries. If the remote stops talking with the fan and no lights are turned on, it is advisable to begin troubleshooting by replacing the batteries. It is necessary to use brand-new batteries for this purpose. If the batteries have been stored in a drawer for an extended period, they may also be dead by now. After replacing the batteries, if the remote still fails to operate the fan entirely, the next step involves troubleshooting the dip switches and/or programming
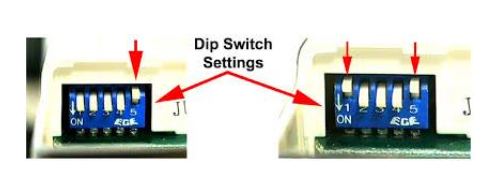
Check dip switches
Most ceiling fans usually use an IR (infrared) frequency for communication. To ensure proper communication on the same channel, both the remote and the ceiling fan receiver employ dip switches to establish their broadcast and receiving frequencies. Inside the remote, near the battery compartment, you will find a set of dip switches. Similarly, the ceiling fan receiver also contains a set of dip switches. Typically, when a ceiling fan is shipped from the factory, both the remote and the fan receiver are set with the same configuration of dip switches.

Generally, the dip switches remain unchanged unless someone intentionally modifies them. In most cases, they remain in their original configuration and do not require adjustment.
Reprogram the Ceiling Fan Remote & Ceiling Fan
Resetting the ceiling fan and remote involves unplugging the fan from the wall for approximately 15 seconds. However, it’s important to keep in mind that unplugging the fan directly from the wall is not always a simple task. In the case of hard-wired ceiling fans without a visible plug, an alternative approach is recommended. Instead of attempting to unplug the fan, you can turn off the circuit breaker that supplies power to the room where the fan is installed. Wait for approximately 15-20 seconds, and then restore power by turning the circuit breaker back on.
Furthermore, try holding the off button from the remote for about 30 seconds. Many ceiling fan remotes have a reset function that can be activated within approximately 15 seconds.
Referring to the manual for your specific ceiling fan is also important. The manual may provide additional troubleshooting information and instructions specifically related to the remote control
Pair the Ceiling Fan with a Remote
To reset the ceiling fan and remote, follow these steps:
- Switch off the ceiling fan by turning off the power at the panel, unless you are already working on the fan.
- Wait for 60 seconds before turning your fan on again.
- Press and hold both the light and fan buttons on the remote simultaneously.
- As a successful pairing, the fan should begin rotating at a low speed
How to access the ceiling fan receiver
To verify and adjust the dip switch settings, accessing the receiver inside the fan becomes necessary. It’s important to remember that the dip switch settings determine the communication frequency between the fan and the remote. Typically, the dip switches on the receiver, located inside the fan, do not change unless there are specific events such as the fan falling off the ceiling or the fan being opened for maintenance purposes. However, if there is reason to suspect that the dip switches on the remote have been altered, it is advisable to check the dip switch settings inside the fan to ensure they match the remote’s settings.
After attempting various troubleshooting steps like changing batteries and performing a reset, if the issue persists, it may be time to consider replacing both the remote and the receiver. You can purchase a universal ceiling fan remote and receiver kit, which includes a receiver that can be used to replace the existing one inside the fan. While the fan is open for inspection, it is a good opportunity to proceed with the replacement if necessary.